My Messages
eConnect messages transmit official communications sent by Dallas College. These communications include important notices regarding your academic or student record and are maintained as a permanent part of your record. These communications are only available through eConnect for 150 days from when they are received.
Follow these steps to manage new or unread messages:
Step 1:
In the address bar of a web browser (e.g., Google Chrome, Microsoft Edge or Mozilla Firefox), enter econnect.dcccd.edu.
Step 2:
On eConnect, choose Current Credit Student Menu.
Step 3:
Under My Personal Information, choose My New Messages.
Step 4:
On the Log In page, enter your Student ID and Password. Then click Submit.
Step 5:
To review messages:
1. Click the option button to the left of the message you want to read.
2. Click the Read Message button below the list of messages.
Your message will open. You can use the buttons below the message to print, delete, return to the list of messages, or return to the student menu.
Step 6:
To manage previously viewed messages, click the View Previous Messages button which is located below the list of messages.
Step 7:
To read or delete messages:
1. Use the drop-down menu in the Action column to indicate which messages you would like to read or delete.
2. Select read for each message you want to read. The messages you selected to read are displayed.
3. Select Read or Delete from the dropdown list.
Step 8:
You can restore a deleted message if it has been fewer than 14 days since you deleted the message.
To restore deleted messages:
1. Click the View Deleted Messages button from the My New Messages page to return it to your message inbox.

2. Select the check box in the Undelete column of each message you want to restore, and then click the Undelete button.
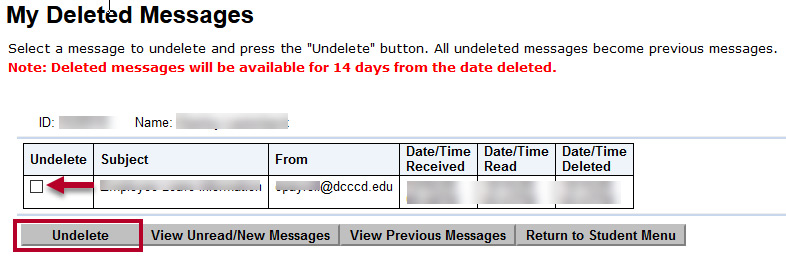
3. Click View Previous Messages to confirm that the message has been restored.
Note:
When you delete a message from eConnect, it is not permanently deleted. The message remains as a part of your official student record. However, 14 days after it has been deleted, it will no longer be available through eConnect.
Step 9:
When you have finished managing your messages, you can click Return to Student Menu to continue working in eConnect or click Log Out in the upper right to exit.
